This is certainly not a break of convenience, it is a break of necessity.
Over the last month I have acquired another VX800, this one an original 1990 California version. After MANY hot days spent in the garage, all that remains, hopefully, is to disassemble the rear carburetor, clean, reassemble then mount both and I should have a running bike. After that, the carburetors will need to be balanced, new front tire mounted, fender mounted, speedometer worm gear mounted, new spark plugs and I should have a running, ready to register and insure motorcycle.
As a matter of fact, I just received the clean Nevada title for it today in the mail.
However, this Las Vegas heat is not terribly conducive to working on a motorcycle. Typical daytime temperatures in my garage are 115F to 120F. Up to 115F is tolerable if well hydrated and water is regularly consumed. However, after six hours in that heat, my body requires a minimum of 24 hours to recover. Last weekend was likely too much strain and full recovery required more than two days.
So, after I finish the rear carb and mount them back on the motorcycle, I am taking a hiatus until the weather cools off.
Oh, here is a post I made on my other blog about the front carburetor and how the diaphragm was messed up.
Ride safe, all!
Friday, July 23, 2010
Sunday, July 11, 2010
Got Another VX!!!
Yes. My main stumbling block in this project was the engine. Either of the two engines I have need serious work to operate. BUT, another VX800 with, what the owner said, was a completely rebuilt engine, came available!
After the engine was rebuilt about 6 years ago, it started having rear carb problems and was put into storage. Over the years he sold pieces from it, so when I looked at it a few weeks ago it was missing plastic pieces, a tank, exhaust and a few other things. Well... I have those parts!
Yes, she does run (not well), but there are carburetor issues. From what people tell me, it is very usual for bikes that have been in storage to have carburetor issues.
So, before I start tearing into her, I want to memorialize what she will look like when complete. Everything is on except the front fender and yet-to-be-designed-built-or-purchased trunk.


Sunday, June 20, 2010
Motorcycle Plastic Repair - Part 3 - Break Repair
 After becoming fairly confident this method would work on a completely broken piece, the two pieces were cleaned with soapy water and rinsed. Please note that clean plastic when doing this sort of repair is quite important. If there is dust and dirt on the plastic, it will become part of the bond and weaken the plastic.
 Plenty of cement was applied to both pieces to be bound together. The broken edges were not sanded smooth. The goal was to help align the pieces properly by fitting the broken parts together the way they broke. There was some resultant deviation in the final bond so perhaps sanding the edges smooth would have been a good idea.
 An oversize fiberglass patch was cut for this. I wanted plenty of support for this.
 After applying not one, but two patches of fiberglass and saturating them with cement the entire thing was held together by your's truly for about 15 minutes. Any sort of more stable wire or clamp based support just seemed overly complex. After 15 minutes of curing the piece could be set down on my work bench so it could complete its curing without holding it together.
After curing was complete, the flash plastic on the finished side was trimmed with a razor, the whole thing sanded with #180 grit sandpaper, washed, rinsed, dried and sprayed with three coats of Rustoleum Flat Black Acrylic Enamel. It is the same used on my front and rear fender.
In the final outcome of this break repair, there could be improvement. I could have sanded the joint a lot more for a completely smooth surface. My goal here is not perfection but experience.
 Please note... Just before taking this picture I ate a breakfast of pancakes with powered sugar. I get my camera, slightly wipe the repaired crack with my hand and take the picture. Little did I know, or realize at that moment, the powered sugar remnants on my hand would be so attracted to the plastic and show up as obviously on the crack. So, just a hint... before taking pictures of repaired cracks, wash all powered sugar from your hands. :-)
Motorcycle Plastic Repair - Part 2 - Complex Cracks and Ready for Clear Coat
After what seemed like success on the smaller crack I attempted to repair the larger crack.

After applying ample cement and fiberglass, this crack required bracing to maintain the required shape while curing.
 Sometimes one must be creative. After trying several brace points, this one was found to be best. This held the repaired cracks together quite well.
 (Picture after the large crack repair had completely cured.)
After the cement cured I removed the VX800 label with a razor blade. Previous attempts with chemicals and sandpaper were successful but required a lot more work than a simple razor.

I then again donned a breathing filter/mask and eye protection, and sanded down the existing clear-coat with #180 grit sandpaper. Where the plastic cement squeezed through to the finish side, excess was easily removed with a razor. The cement will not adhere to the finish. Or more appropriately, didn't in my case. These points were sanded smooth. Yes, some of the welded crack repairs can be seen on my experiment, but with more work and sanding they can for the most part be made invisible on the finish side.
At this point I washed the now sanded, finished side well with soapy warm water, rinsed and let dry. Cleanliness is important if you want a good finish. Even the smallest dust particles will leave marks in the finish.
After the piece was dry I wiped it down with a dry cloth in an attempt to remove the dust. This was a mistake as that created a static charge on the plastic piece, making it attract dust particles like moths to a porch light.
After cleaning the dust off as best I could with a damp cloth, the piece was coated twice with Rustoleum Sandable primer. After drying I wet sanded the primer with #1200 grit sandpaper, rinsed and let dry.
I then applied two coats of Rustoleum Gloss Protective Enamel #7762 Sunrise Red. After three days curing time, the red was wet sanded with #1800 sandpaper and wiped down with a damp cloth. It then received a final coat of red paint.
In this experiment, the final desired result was knowledge and experience, not a perfect piece. Regardless, the resultant piece, ready for clear coat turned out quite well, if I do say so myself. With more sanding, time and a few more coats of primer and red, I have no doubt this could result in a mirror finish.
 (Please note that the picture does not properly depict the true color of the paint. It is much more red with a somewhat pearl finish in the sunlight than shown here.)
Coming up - Part 3 - Repairing a complete break.

After applying ample cement and fiberglass, this crack required bracing to maintain the required shape while curing.
 Sometimes one must be creative. After trying several brace points, this one was found to be best. This held the repaired cracks together quite well.
 (Picture after the large crack repair had completely cured.)
After the cement cured I removed the VX800 label with a razor blade. Previous attempts with chemicals and sandpaper were successful but required a lot more work than a simple razor.

I then again donned a breathing filter/mask and eye protection, and sanded down the existing clear-coat with #180 grit sandpaper. Where the plastic cement squeezed through to the finish side, excess was easily removed with a razor. The cement will not adhere to the finish. Or more appropriately, didn't in my case. These points were sanded smooth. Yes, some of the welded crack repairs can be seen on my experiment, but with more work and sanding they can for the most part be made invisible on the finish side.
At this point I washed the now sanded, finished side well with soapy warm water, rinsed and let dry. Cleanliness is important if you want a good finish. Even the smallest dust particles will leave marks in the finish.
After the piece was dry I wiped it down with a dry cloth in an attempt to remove the dust. This was a mistake as that created a static charge on the plastic piece, making it attract dust particles like moths to a porch light.
After cleaning the dust off as best I could with a damp cloth, the piece was coated twice with Rustoleum Sandable primer. After drying I wet sanded the primer with #1200 grit sandpaper, rinsed and let dry.
I then applied two coats of Rustoleum Gloss Protective Enamel #7762 Sunrise Red. After three days curing time, the red was wet sanded with #1800 sandpaper and wiped down with a damp cloth. It then received a final coat of red paint.
In this experiment, the final desired result was knowledge and experience, not a perfect piece. Regardless, the resultant piece, ready for clear coat turned out quite well, if I do say so myself. With more sanding, time and a few more coats of primer and red, I have no doubt this could result in a mirror finish.
Coming up - Part 3 - Repairing a complete break.
Motorcycle Plastic Repair - Part 1 - Cracks
Over the last few weeks, after the failure of attempting to use a soldering iron to mend the broken plastic on my VX, I decided to try my hand at using a plastic cement, or "chemical welding." As a complete novice, the pieces came out rather well.
Before getting into the details of this, the standard disclaimer applies: I am just a beginner; this may not work in all situations; this method my not be optimal but worked for me; I am not responsible for ruined plastic, fiberglass stuck in your skin or fingers stuck together. Remember... YMMV.
First things first. There are several different types of plastic used on motorcycles. Luckily most plastics are marked. In my case, it was not. However, there is a typical rule of thumb that unidentified black plastic is ABS (Acrylonitrile butadiene styrene). It is important to know what kind of plastic is being repaired. Mismatching plastic to cement can cause your plastic piece to liquefy or do other bad, bad things.
After some research it was determined my parts were indeed ABS. A quick trip to Lowes and less than $10 yielded enough fiberglass sheeting and ABS cement to fix two dozen motorcycle plastic pieces.
The type of cement used is Oatey Medium Black ABS Cement. It is intended to be used on ABS plumbing but works quite well in this application.
***WARNING***
DO NOT smoke or have open flames nearby while doing this. The cement releases flammable chemicals while curing. JUST DON'T!
***CAUTION***
The fiberglass in the sheeting splinters easily. Use gloves while handling or expect to get fiberglass splinters. Further, USE A FACE MASK or OTHER BREATHING FILTER. Fiberglass splinters in your throat or lungs is NO FUN and can cause very bad things to happen. And, as always, when doing things like this, wear eye protection.
OK, onward...
Step 1 - clean and scrub the cracks with warm soapy water (dish-soap worked well for me). Rinse well and allow to completely dry.
 Step 2 - Cut a patch of fiberglass that will overlap the crack or break by at least 2/3 inch on either side. 2 inches overlap would be even better. Cut the fiberglass with a fresh razor blade, not scissors. Scissors will splinter the fiberglass badly.
 Step 3 - Apply a liberal amount of ABS cement to the inner part of the plastic piece, where there is no finish or coating. If there is any finish or coating on the inner part of the plastic, it must be removed. This only works when the cement contacts raw ABS plastic. Be sure to get the cement into the crack.
 Step 4 - Apply the fiberglass patch.
 Step 5 - Apply enough cement to saturate the fiberglass and adhere it to the plastic.
 And here is the finished product from the inside. It isn't pretty but after completely curing for more than 24 yours, this patch seems to be just as strong as the surrounding plastic.
Part 2 - coming soon. Complex Cracks and Ready for Clear Coat.
Monday, June 7, 2010
Plastic Repair with a Soldering Iron
It's Monday; lunchtime. Time to try my hand at plastic repair.
 This is part of the right plastic panel from VX#1. Completely failing would be painful, but I have the plastic from VX#2 and it is in much better condition.
 First, I pressed aluminum foil onto the piece. The thought was that it would help keep the heat focused on the plastic and not allow the plastic to burn. See how well the crack stands out on the foil?
 I then started by following the crack with the point of the iron. I didn't press too hard at all. I wanted the plastic to heat evenly and slowly. After I could feel the plastic become soft, I started rolling the tip of the iron so plastic around the crack would melt into the crack.
 Here are my initial results. Yes, they look a little rough but at least the plastic didn't burn.
The results were indeterminate. The smaller crack on the left sealed well. The larger crack on the right did not completely bind through the crack. It may be due to the heat not being applied for long enough. That is my uneducated guess anyway.
Tomorrow I will attempt longer exposure to the heat.
I also found this interesting post about using a soldering iron to repair larger cracks and broken plastic pieces. Looks promising. The author recommends using aluminum screening to reinforce the plastic. Looks like it is worth a try.
PROLOG-------
The crack seal attempt did in fact, fail. I stressed the piece and even the small crack opened. But I learned that the heat needs to be applied for a longer period of time to heat the plastic more thoroughly. We shall see if my second attempt tomorrow succeeds.
Sunday, June 6, 2010
Vixen Has Her Brain Stem
Hopefully this is not a post to disappoint.
During the course of the past month I have spent a little time here and there working on Vixen. There seemed to be distractions or lame excuses for not spending time in the garage. Honestly I was in a motorcycle wrenching funk. It simply did not feel right.
Yesterday (Saturday) I did the same thing. I brought out the wiring harness and removed the old cracked binding tape. It was NOT in very good condition.
 The wires were filthy with dirt and dust and the remainder of sticky tape muck. The old tape removed, I bound up the harness with solid hook-up wire so it would not fall apart. The plan for the weekend was to simply get the tape off and clean the wires, nothing more. It was 110F by 10AM so I called it a day and retired inside to wast the time away on the computer.
Sunday came, I drove my daughter to work, made breakfast, washed dishes, and did some rather time consuming work tasks; the latter of which caused me to miss out on a poker run.
At about 11AM work was done. I ran water in the sink and put plenty of dish soap in to make it nice and sudsy.
 And I proceeded to scrub away...
 The wiring and all connectors were well scrubbed with a stiff plastic brush. When done, there was a large improvement.
 It was set outside on a step ladder to dry in the parching Las Vegas sun. At over 110F in the garage, drying did not take much time.
Since I had plenty of soapy water, there was no need to waste it. So, the cracked side panels from VX#1 were scrubbed and rinsed. These will experimented on a bit; I want to find the best way to mend the plastic. The panels on VX#2 are in better condition but has a piece completely broken off. Sorry, no pictures.
However, an object in motion tends to stay in motion. There was a determination to accomplish more today, temperature be damned. With a large bottle of cool water (for me) and a large jug of soapy water (for VX#1's gas tank) I proceeded to clean the tank in preparation of an electrolysis treatment to remove the rust. Here is what came out of the first rinsing...
 Serious ugliness... After several rinses the water came out clean. If all goes well, the electrolysis treatment will be attempted next weekend. Then, if all goes well; no more rust.
At this point, there was no stopping. The garage thermometer read 117F. Too bad. There was plenty of water and there were things to do.
A trip to Lowes yielded the purchase of two rolls of Scotch #2242 Linerless Rubber Splicing Tape and a roll of Scotch #35 Red Vinyl electrical tape.
 The red was purchased to be used as support in the harness where wire entered and exited the bundle. The black was recommended by a fellow on ADVRider.
 Here is a sample of how the red tape was used. Granted, there is not much physical stress on the harness when in place, I had no desire to do this again. So...
 And here is a sample with it completely wrapped. The thick rubber tape was chosen because it is thick and primarily made of rubber. Not only does it provide a decent waterproof seal, but provides a good level of protection against vibration and abrasion.
There was more...
 The headlight enclosure looked lonely. So I threaded the harness into the enclosure. Yes, it is supposed to look that messy.
 And attached the headlight and front turning signals. The signals are not stock VX, I picked them up somewhere over the last year. I think they go well with my black and red theme.

 And then, I had a beer. Honestly I had not planned on getting this far until next weekend.
During the course of the past month I have spent a little time here and there working on Vixen. There seemed to be distractions or lame excuses for not spending time in the garage. Honestly I was in a motorcycle wrenching funk. It simply did not feel right.
Yesterday (Saturday) I did the same thing. I brought out the wiring harness and removed the old cracked binding tape. It was NOT in very good condition.
 The wires were filthy with dirt and dust and the remainder of sticky tape muck. The old tape removed, I bound up the harness with solid hook-up wire so it would not fall apart. The plan for the weekend was to simply get the tape off and clean the wires, nothing more. It was 110F by 10AM so I called it a day and retired inside to wast the time away on the computer.
Sunday came, I drove my daughter to work, made breakfast, washed dishes, and did some rather time consuming work tasks; the latter of which caused me to miss out on a poker run.
At about 11AM work was done. I ran water in the sink and put plenty of dish soap in to make it nice and sudsy.
 And I proceeded to scrub away...
 The wiring and all connectors were well scrubbed with a stiff plastic brush. When done, there was a large improvement.
 It was set outside on a step ladder to dry in the parching Las Vegas sun. At over 110F in the garage, drying did not take much time.
Since I had plenty of soapy water, there was no need to waste it. So, the cracked side panels from VX#1 were scrubbed and rinsed. These will experimented on a bit; I want to find the best way to mend the plastic. The panels on VX#2 are in better condition but has a piece completely broken off. Sorry, no pictures.
However, an object in motion tends to stay in motion. There was a determination to accomplish more today, temperature be damned. With a large bottle of cool water (for me) and a large jug of soapy water (for VX#1's gas tank) I proceeded to clean the tank in preparation of an electrolysis treatment to remove the rust. Here is what came out of the first rinsing...
 Serious ugliness... After several rinses the water came out clean. If all goes well, the electrolysis treatment will be attempted next weekend. Then, if all goes well; no more rust.
At this point, there was no stopping. The garage thermometer read 117F. Too bad. There was plenty of water and there were things to do.
A trip to Lowes yielded the purchase of two rolls of Scotch #2242 Linerless Rubber Splicing Tape and a roll of Scotch #35 Red Vinyl electrical tape.
 The red was purchased to be used as support in the harness where wire entered and exited the bundle. The black was recommended by a fellow on ADVRider.
 Here is a sample of how the red tape was used. Granted, there is not much physical stress on the harness when in place, I had no desire to do this again. So...
 And here is a sample with it completely wrapped. The thick rubber tape was chosen because it is thick and primarily made of rubber. Not only does it provide a decent waterproof seal, but provides a good level of protection against vibration and abrasion.
There was more...
 The headlight enclosure looked lonely. So I threaded the harness into the enclosure. Yes, it is supposed to look that messy.
 And attached the headlight and front turning signals. The signals are not stock VX, I picked them up somewhere over the last year. I think they go well with my black and red theme.
 And then, I had a beer. Honestly I had not planned on getting this far until next weekend.
Wednesday, May 12, 2010
Last Few Weekends
Here are some pictures of the work I have done on Vixen for the last few weeks. There is progress, regardless of how slow it may seem to me and possibly others.
 Luckily I have two VX800 radiators. One radiator was full of tar and sand from its midpoint down. Using heat and tar remover, it could be cleaned but there was some concern about the sand grating against the Aluminum and causing tiny leaks. So, I chose the one that had bent fins and was missing a bit of paint. The fins were tedious to straighten but was certainly not difficult.

 Here are the results of the radiator work. Everything was scrubbed down, the radiator checked for leaks and the two temperature sensors tested. I did think about painting it a flat black but decided it was not necessary. If it is needed later on, the radiator is quite easy to remove.
 And, I finished rebuilding the foot pegs and mounts. The shields and pegs were cleaned, primed and painted with engine enamel. Both pegs received fresh pins, washers and a little Lithium grease.
And so, this weekend? Who knows.
 Luckily I have two VX800 radiators. One radiator was full of tar and sand from its midpoint down. Using heat and tar remover, it could be cleaned but there was some concern about the sand grating against the Aluminum and causing tiny leaks. So, I chose the one that had bent fins and was missing a bit of paint. The fins were tedious to straighten but was certainly not difficult.
 Here are the results of the radiator work. Everything was scrubbed down, the radiator checked for leaks and the two temperature sensors tested. I did think about painting it a flat black but decided it was not necessary. If it is needed later on, the radiator is quite easy to remove.
 And, I finished rebuilding the foot pegs and mounts. The shields and pegs were cleaned, primed and painted with engine enamel. Both pegs received fresh pins, washers and a little Lithium grease.
 And so, this weekend? Who knows.
Thursday, April 15, 2010
Long Time, No Blog
Life has indeed been busy. My place of employment is moving offices, I am now a 'most-of-the-time' telecommuter and several unexpected expenses have all conspired against my rebuild project. The last two weeks have minimally offered time to work on my project. If all holds, this weekend will be the same; several hours of garage time.
Through my stolen moments in the garage, the swing arm has been mounted, steering bearings replaced, fork mounted, carburetors mostly cleaned and both engines torn down to where parts can be cleaned, evaluated and reassembled.
Don't worry, there will be plenty of pictures.
kodabigpup sent a comment on my previous post:
"nice bike, i have one also...
i have a question for you, i am trying to replace my ignition switch but, i cant figure it out, is it a special tool to take off the nuts off the bottom of the ignition? i dont want to strip the ones on there currently."
Unfortunately, according to the service manual, the ignition switch cannot be replaced without breaking things. That is the way they designed it, likely as a theft deterrent. In Las Vegas, locksmiths charge nearly $60 for a re-key. This may be a possible option if the ignition/key switch is in acceptable and operable condition.
Saturday, February 13, 2010
Instrument Panel Done and Tested!
 And here are the "after" pictures of my VX's instrument panel. The metal bracket was stripped, primed with self-etching primer several times and then hit with several coats of Rust-oleum flat black.
 All screws, washers and nuts were cleaned on a wire wheel. The plastic housing was carefully cleaned, roughed up with 120 grit sandpaper and hit with several coats of primer. After a good period of drying, several coats of black were applied. All bulbs were tested individually while out of the harness. Luckily only three large bulbs and one small bulb needed to be replaced. Only $10 at my local neighborhood Nevada Suzuki.
Just before putting the whole thing back together, everything was cleaned. Apparently several families of spiders had made this their home. My old toothbrush did wonders.
Everything was put in place to test fitment. After a minor adjustment or two to the home-brew gauge gaskets, everything was closed and bolted tight.
Then, after nearly going blind trying to read a rather poor copy of the electrical layout, the instrument panel wiring tested 100%!
Ah, but I didn't stop there. I also mounted the repainted brace and front fender to the forks. All mounting bolts are new and I increased the height of the brace as much as possible by adding washers. Several folks suggested I consider a more multi-purpose tire for where I want to take her. That requires a little extra clearance. Hopefully this will do. That is as high as she will go without doing some work on the fender.

And last night the battery box was mounted to the frame. What a pain in the ass! It did NOT want to go in there. After a little scraped red paint, the battery box was in place.
 Until the swing arm bearings are replaced, nothing else is going on the frame. Nevada Suzuki will be removing and replacing the steering head bearings and rear swing arm bearings as soon as I get them. No way do I want to put a partially built-up frame in the back of my pickup.
So... Looks like the carburetors are next on my list.
Monday, February 1, 2010
Instruments (Before)
Life has been busy, and evenings too cold to do much. That not withstanding, the instrument cluster has been disassembled and is in the process of being cleaned and repainted. The foam rubber pieces, instrumentation vibration dampener and a few bulbs need to be replaced. If all goes well, the instrument cluster parts should here by Friday and it should be back together this weekend.
This is not a picture of my VX800 instrument cluster; this was located on the internet some where. This weekend, the 'After' picture.

This is not a picture of my VX800 instrument cluster; this was located on the internet some where. This weekend, the 'After' picture.

Saturday, January 30, 2010
Picture Update - Damned Paint and Bearings!
 I knew the time would come when I needed to order parts. That time arrived last weekend. The front forks and steering stem was removed from V2, scrubbed, cleaned, inspected and mounted on V1.
After a bit of testing, reading, evaluation and asking about it on the VX800 e-mail list, the decision was made to replace the bearings. There was a 'notch' in the steering motion at about the one-o'clock position. Apparently this is not uncommon on these bikes and indicates that the bearings need to be replaced ASAP.
A fellow VX800 owner and wrencher suggested AllBalls for a steering bearing kit. They are fairly inexpensive and they have a good reputation. The local AutoZone had Timkens for about $30 each that would work and the local Suzuki shop had them for about $40 each. Both of them from AllBalls were about $40.
About Wednesday evening I decided to mount the swingarm. Well, the bearings need to be replaced there as well. Can't get them from AllBalls or AutoZone, so, will likely get them from Babbits.
 Last weekend I also took apart the instrumentation panel to clean and repaint it. Must have really ticked off a few family of spiders!
There are a few bulbs that need to be replaced and some rubber seals but overall, the entire instrumentation unit looks solid.
Now, one thing I want to say about the paint... I picked the Duplicolor Victory Red for the frame. Under it is the recommended primer. Over it is the recommended clear-coat; Duplicolor Truck and SUV ClearCoat. This morning I spent some time trying to figure out how the battery box should go in. Well, in the course of this little three dimensional puzzle play, the battery box lightly scraped the frame. Off comes the paint.
Luckily, this is a fairly hidden spot, and the underlying frame paint held up. It was still irritating to see how fragile this paint job is. Next time, if there is a next time, red powder coat all the way. Last year I received a quote of $325 for all red. Should have done it. Maybe it is not always a good idea to scrimp and save when doing a motorcycle restoration.
Off to wrench for the weekend!
Friday, January 22, 2010
Why Red?
 A few people asked why I went with the color red. The answer may sound odd, but here it is.
My favorite aviary animal is the Red Winged Blackbird. Even before I started riding about two years ago, the idea of having a bike styled after this bird was tumbling around in my mind. After purchasing my first VX800 about a year ago, there was no question how it would be styled. The specifics though, where still up in the air.
Several thoughts tumbled around in my brain... All black with red side stripes? All black with a red engine? There was definitely some uncertainty.
 After getting her apart and ready to paint, there was one way to go... All flat black with a red frame. Luckily my second VX, the donor bike is black so picturing it in my mind was a little easier.
There are still some styling questions in my mind, but I am certain that when the time comes, it will all come together.
Monday, January 18, 2010
Just A Few Sneak Peeks.
OK, for those visually stimulated folks...
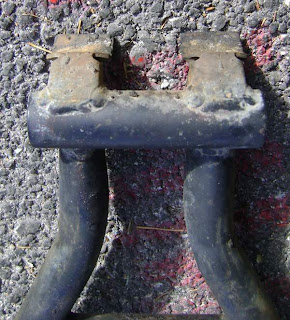 Center Stand Before Cleaning
 Center Stand After Cleaning, Wire Wheel, Sanding, Priming (two coats) And Three Coats of Dupli-Color Flat Black
 Frame After Cleaning (3 or four times), Wire Brush, Sanding, Primer (three coats), Dupli-Color GM Victory Red (three coats) and Dupli-Color Truck and SUV Clear Coat (three coats)
 Center Stand Before Cleaning
 Center Stand After Cleaning, Wire Wheel, Sanding, Priming (two coats) And Three Coats of Dupli-Color Flat Black
Subscribe to:
Posts (Atom)

